Popular Posts

Showing posts with label Thrifty Styling. Show all posts

Tuesday, 7 May 2013

Grabbing your Colour Scheme from an Artwork

As I was cleaning out a cupboard full of re-claimed frames that I have collected, I came across an art work which my mum had given me to re-purpose. The painting contained all the colours that I had grouped together in the kitchen (a total coincidence). Teal, violet, white, black, grey, cream, a touch of red and inky blue.  So I threw the painting in to the mix and it's now an anchor for the array of colours that I had used. Pictures are a clever way to tie together a random and unpredictable colour scheme...........

So if you are wanting to do a multiple colourway in a room and don't know where to start............ an art work (you might already have) could be your source of inspiration and the link that you need..........
The lampshade on the left below I intend to cover when I get back from our holiday, super simple to do, I'll show you how......


this is my final post before going on holidays for 2 weeks as of tomorrow...........I have heaps of DIY'S in store to try out and report on when I get back. .................. so have a fabulous fortnight and BYE for now!!!!

 just a quick pic of the same colour way, but used in different quantities..............

Monday, 6 May 2013

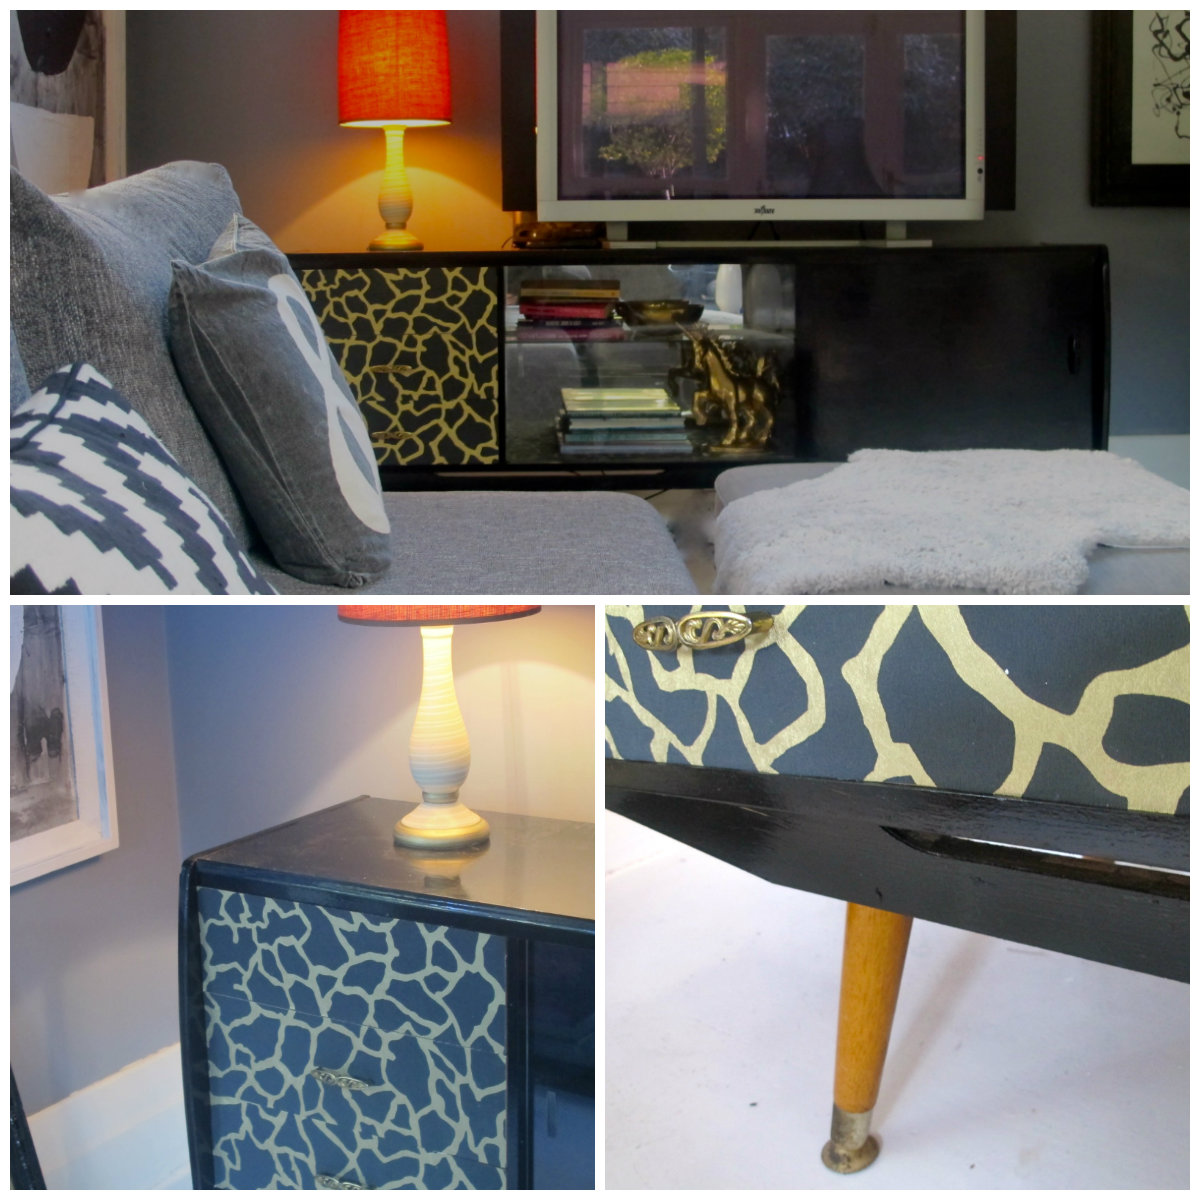
Laminate Retro Cabinet Overhaul

If you have been influenced by the retro movement AHLA 2013 then try to grab one of these cabinets at a thrift store. This guy started off as a brown laminate cupboard which I forgot to take a before shot of. Anyway, after realizing this I took a photo mid stream before I papered the drawers. 

the wall paper was on special from here....... great value, crazy giraffe print, gold and black.............


So below is two coats of full gloss enamel black, handles taken off and drawers sanded........ you can see by the drawers what its original finish was...........


Once you've chosen your wall paper measure and cut to size with a blade...........


 With a good quality glue, spread over the paper................


Trim around the edges with your blade for an accurate finish ....


 Screw your handles back on........... and WAHLA.............


Here is a similar shaped retro number that I up cycled a little while ago.............both items were super bargains from a thrift store...............


Sunday, 5 May 2013

Re Vamp your Kitchen from White to Black in 12 Hours

I had a busy weekend up-cycling our kitchen cupboards from being mainly white to mainly black. I am totally over the white minimal look so I was busy going the polar opposite, black.......

 A few of the kitchen cupboards have been black for quite some time but I took it one step further and now the majority of the cupboards are black. 

It was a tricky decision on which cupboards to leave white......... Our larger appliances are white, therefore I needed to leave a few of the cupboards white to pull it all together. Doing this created interesting blocks of white in amongst the blocks of black. Your appliances need a lot consideration when you are flipping your cupboards from one colour to another. You need to create a link with a fixture so that they look as if they belong. My link was the splash backs, sink and leaving a few random cupboards white. 

I would always choose to have wooden cupboards (boring but practical), purely for the ability to be able to change the mood of the kitchen within a day with minimal outlay. I agree that there are some amazing materials that I would love to use in a kitchen but if you can't justify ripping off the doors when its time to up-date, I'd be sticking with a material you can paint, strip or stain.


The kitchen before I started with its cupboards mainly white............


Thursday, 2 May 2013

On the Hunt for the Cheapest Pelts

Well I did go on the hunt for suitable synthetic pelt fabrics like I said I would not so long ago. I wanted to see if I could find a cheaper option to create this super cool look other than buying the amazing $300.00 real deal pelts that are going around. Unfortunately I came up with nothing exceptional. Material prices were consistent around the board. The standard price is about $50-$60 per meter. It would take 3/4 of a meter for a faux pelt, cut in to the shape of an authentic skin.
I liked the black faux skin material the best but there were others that looked way to fake. The best option if your not wanting to pay the big bucks is either Ikea or keep a close eye out at thrift stores. I found all three of these skins at different thrift stores. One in particular is super shaggy and cute. I have had them for a little  while, each one costing me $15.00.
If I find another I will be very tempted to dye it black to see how it comes out, but for now I am happy with my purchases. The wire chairs I found on the side of the road and sprayed them silver.

These wire chairs travel from room to room, not having found a permanent home for them just yet. Both chairs with their skins, total cost $30.00 the pair............


The grey pelt that sits on our ottoman is available from Ikea............


 I found this image on the net ages ago. A great idea that would instantly jazz up a set of french provincial style chairs. I don't know the origin of the photo but thought it would be totally achievable with faux pelts.............


Have a great weekend everyone......Andrew and I are going on holiday this Wednesday for a few weeks. I am a little nervous that I might have a mini melt down without my computer and my paint brush!!!!!

Tuesday, 30 April 2013

Thinking Outside the Square

Do you find there's limited space within your kitchen area??? Our kitchen is a "normal" size I guess. It's not a small galley kitchen but it is missing a good size pantry area and a broom cupboard. We have a 600 oven (that's all that will fit) and an average size fridge. So its not at all "massive". When I found this locker at a thrift store the other day I was thrilled. I swing between industrial, French industrial, a tad of glam (granny style) a mix of disposable on trend items, a touch of retro and use basic chunky shapes. So we will throw this into industrial..........yep it should fit in. I painted it black because I didn't want it to be a feature.....just an extension of the kitchen wall, and its function will be a "broom cupboard". I like to paint furniture the same colour as a wall . It becomes part of the wall adding a shadow effect rather than being a highlight item. So what a great shape for a broom cupboard.........$35.00 complete!!! If you need to do stuff "on the cheap" you have more scope to be inventive so think outside the square and find something within the budget. There are definitely pieces out there once you start the hunt..........


This was its original state.........

People often say, "but I have no vision". If that truly is the case but  you are drawn to a shape, its the right size and the piece has a function, then paint it your wall colour and accessorize with colour or texture and you should be right. BUT if you see potential and you do have vision then go all out.........its only paint. I had a client the other day after I told her I would help her find 2 sidetables of the right dimensions then she could paint them "hot pink" (they are going on very dark walls), she said to me that she couldn't paint. That she was too fussy with the finish. When your on a budget then you need to do some tradesman's work I'm afraid to get the job done and be happy with the best you can do...........
What do you think about a shot of hot pink??

Monday, 29 April 2013

Bring your Desk out of Hiding

As an extension on yesterdays post creating rooms within rooms, I've posted a few desk images to muse over. I'm totally over the white wall vibe but their arrangements are pretty coolAnd I like  it when you don't know that the workspace is even there, you just stumble across it as you scan around a room............


The floating desk is a simple idea with a couple of barrel shades hung low teamed with a comfy chair. Really, use any table,with any chair, mismatch the whole arrangement. Plonk interesting items on it to add colour, texture and purpose. Layer up the look. Use whatever you have and replace your items as you find things more appropriate . This is what I do. I love the big bowl of photos, I will definitely be dragging out the snaps some time soon.......................I can see my friends coming in and sifting through the images asking questions, reflecting on the past and having a good old laugh..............

and here is a desk that sits in our entrance, thrift store find which I up-cycled with a chevron pattern................... I up-cycled it to sell, but realised when I got it home that the desk lid was sticking and needs filing. I haven't got around to fixing it yet, as you can see..........soon I will ( I tell myself) and then she will be on the market.............


Friday, 26 April 2013

Indoor Plant Survival Tips.......No No Go the Faux

I went to get a plant for my 'newly painted, old 70's trolley' that I up-cycled the other day along with a stack of paint that I needed.

I was intending to buy a specimen that was alive and kicking......although my plans changed. When I was going through the check out the assistant said to me "so is this aloe vera?" hello........ it was
aloe vera, of the plastic kind.

I was so stoked that the assistant thought that this little guy was the real deal. It was such a convincing replica, she didn't know that it was one of their faux plants!!!! So I purchased it from here, if you're interested. Cant find the actual page for it but, oh well sorry..........

This morning when I opened up my mail box I saw this article from apartment therapy with an aloe vera plant staring me in the face. I read it and thought, no need to worry about that!!............. Check out more fakes here in amongst our garden that have never raised suspicion.............


 The little brass pot was from a thrift store, cheap, cheap. Like I said here, I'm on the rampage, collecting "gold" along my travels...........I hope everyone has a great weekend. 

BTW....I'm planning to attack my site this weekend and I'm not the clueist (is that a word?) individual when it comes to IT stuff ............... hopefully it will be smooth sailing, hmmmm ..............

Thursday, 25 April 2013

Working with an 8 Dollar Trolley and a Small Pot of Gold

I purchased this 70's trolley for 8 dollars the other day.

The only appealing aspect of this trolley to me was the grid shelf it had going on. Then I was out at a really cool bar on Saturday night with the family and they had a very similar grid design which was used as a divider.

I knew the trolley needed to be gold, or gold with a turquoise/ teal top, I love this combo......... Its funny when you see a piece and you know exactly what finish it needs.......anyway here are the before and afters of the trolley.............


and the before shots..........


and the wall that convinced me to get this little guy........


that's me on the left with my super cute step daughter, love her..........but we are looking at the screen at the back of us right???,..........


I am really getting into mixing my gold and silver. It adds warmth and bling. Just a quick tip off though. Spraying metallic enamels onto most surfaces doesn't wear well (I've only tried the cheaper spray cans) so use tin enamel and a brush. Water based enamels don't give you the same reflective values...........


Tuesday, 23 April 2013

So Many Shades of Grey

 Abigail Ahern is an inspiration to me. Her eclectic style and the way she throws things together with it all coming out looking so hot is exciting. Bold and moody is how I would describe her style and I am hoping to put into action a few of her colour mixes. I get bored with colour very quickly. I'll have a crack at adding colour and within two weeks I need to paint over it. This has been the pattern of my decorating lifetime, not sure why because I love colour. I think I need to travel this road one more time. As always it will be with items that I can transform back to grey, black, white, silver or gold at a moments notice.  I'm thinking inky blues and mauve's........hmm......... All images below are from Abigail's blog..........check it out!!!

And here are four of her design tips that she has quoted from her site........


1.Paint everything out the same colour – walls, ceiling, trim, and floors as well if you dare – it will change your life and make your space look 10 times bigger.

2.Add more lighting than you think – just when you think you are there I want to persuade you to add more. Lighting expands horizons, which is exactly what you are after in a small space.

3.Add shiny things, things with reflective surfaces throw light around the space, not only that like magpies we are drawn to shiny reflective surfaces as they catch, and tantalise our eye.

4.Don’t be afraid to ramp up the scale by putting things that are to big in these bijou spaces – not only does it give your pad an Alice in Wonderland vibe, it adds a magical twist, an element of the unexpected.